We Upload Lower Quality Images to the Web Because of a Concern for Which of the Following Scenarios.
Trust us, you lot don't want Google to hate your website. Fortunately, you can reduce your image's file sizes to assist improve your website'southward functioning. One problem with formatting them is that modifications frequently reduce their quality (which in plough might make the visitor hate your website). That's not a bad matter as long as y'all don't make them ugly. There are some tricks and techniques that permit you reduce the paradigm's file size and all the same keep them pretty plenty to proudly display them on your website. So allow'due south take a look at how to format your images without making them ugly, likewise as how to optimize images for spider web and performance.
What Does Information technology Mean to Optimize Images?
Large images ho-hum down your web pages which creates a less than optimal user feel. Optimizing images is the process of decreasing their file size, using either a plugin or script, which in turn speeds up the load time of the page. Lossy and lossless compression are two methods commonly used.
- The benefits of formatting your images
- How to optimize images for web and performance
- Image optimization WordPress plugins you tin can apply
- Optimizing images case study
- Using SVGs alongside other images
- All-time practices when using images
Check Out Our Video Guide to Optimizing Images for SEO
The Benefits of Formatting Your Images
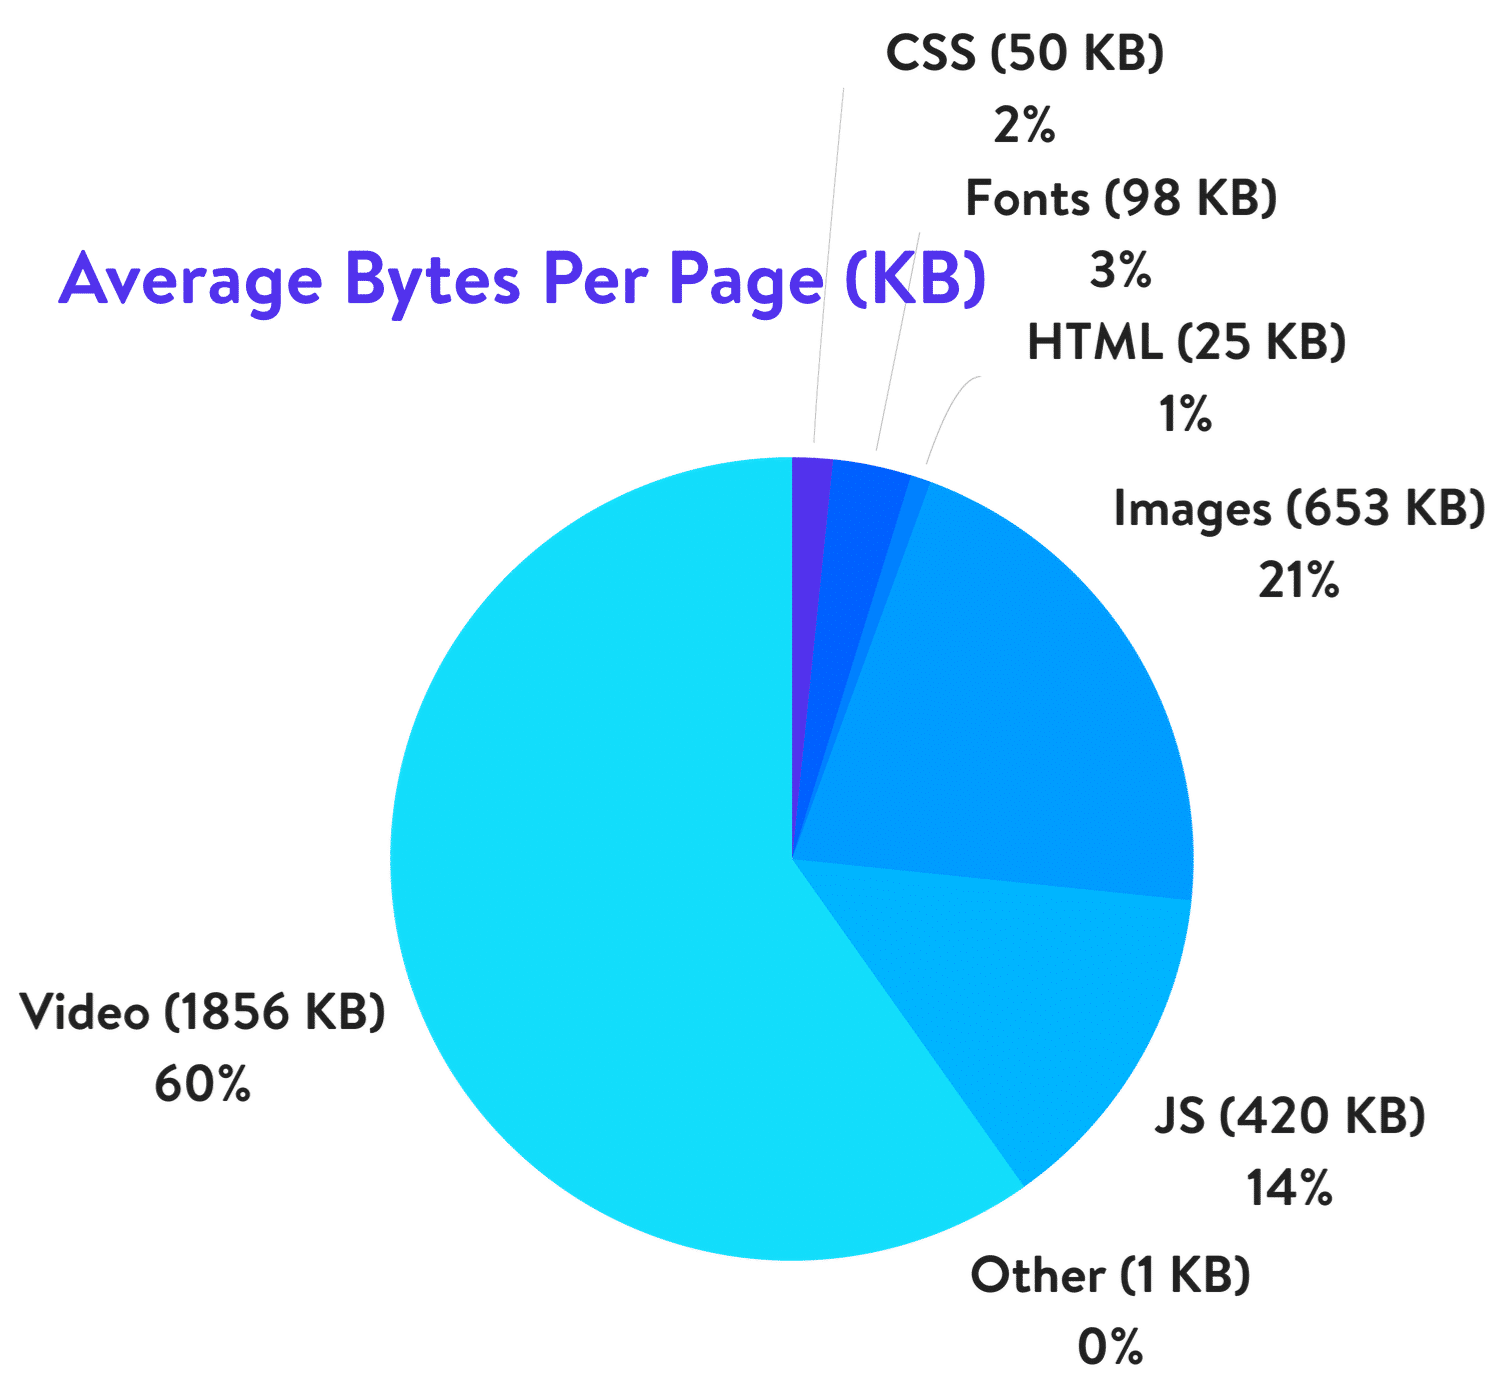
Outset, why do you lot demand to format your images? What are the benefits? There are numerous benefits of optimizing your images for operation. Co-ordinate to HTTP Archive, every bit of November 2018, images make up on average 21% of a full webpage'southward weight. And then when it comes to optimizing your WordPress site, after video content, images are by far the first identify you should start!
Information technology'due south more important than scripts and fonts. And ironically, a good image optimization workflow is 1 of the easiest things to implement, even so a lot of website owners overlook this.
Here is a look at the main benefits.
- It will improve your page loading speed (come across our example study below for how much information technology affects your speed). If your page takes as well long to load your visitors might get tired of waiting and motion on to something else. For more information well-nigh optimizing your page loading time see our in-depth page speed optimization guide.
- Combined with a neat SEO WordPress plugin information technology improves your SEO. Your site will rank higher in search engine results. Large files irksome downwards your site and search engines hate boring sites. Google is also likely to crawl and alphabetize your images faster for Google image search. Curious about what pct of your traffic comes from Google image search? You tin use a Google Analytics WordPress plugin or segment to check Google epitome search traffic.
- Creating backups will exist faster.
- Smaller image file sizes utilise less bandwidth. Networks and browsers will appreciate this.
- Requires less storage infinite on your server (this depends upon how many thumbnails yous optimize)
How To Optimize Images for Web and Performance
The primary goal of formatting your images is to notice the balance between the lowest file size and an acceptable quality. There is more than one way to perform almost all of these optimizations. One of the most pop means is to but compress them before uploading to WordPress. Usually, this tin be done in a tool like Adobe Photoshop or Affinity Photo. Some of these tasks tin can also be performed using plugins, which we will get into more than below.
The two primary things to consider are the file format and type of compression you use. By choosing the correct combination of file format and compression type you can reduce your image size by as much as 5 times. You'll have to experiment with each epitome or file format to see what works all-time.
Choose the Correct File Format
Before yous offset modifying your images, make sure y'all've chosen the best file type. In that location are several types of files you tin apply:
- PNG – produces higher quality images, but as well has a larger file size. Was created equally a lossless epitome format, although information technology can also be lossy.
- JPEG – uses lossy and lossless optimization. You lot tin adapt the quality level for a proficient balance of quality and file size.
- GIF – only uses 256 colors. It'due south the best option for blithe images. Information technology but uses lossless compression.
There are several others, such as JPEG XR and WebP, but they're not universally supported by all browsers. Ideally, yous should use JPEG or JPG for images with lots of color and PNG for simple images.
(Suggested reading: JPG vs JPEG: Agreement the Most Common Image File Format)
Pinch Quality vs Size
Here is an example of what can happen you shrink an image too much. The first is using a very low pinch rate, which results in the highest quality (simply larger file size). The second is using a very high compression rate, which results in a very low-quality epitome (just smaller file size). Note: The original prototype untouched is 2.06 MB.

As you can run into the first prototype above is 590 KB. That is pretty large for one photo! It is generally best if you can go along a webpage's full weight under ane or 2 MB in size. 590 KB would be a 4th of that already. The 2d image patently looks horrible, but then information technology is only 68 KB. What you want to do is find a happy medium between your compression rate (quality) and the file size.
Then we took the image once again at a medium compression charge per unit and as you tin see below, the quality looks proficient at present and the file size is 151 KB, which is acceptable for a loftier-resolution photo. This is most 4x smaller than the original photo with low compression. Typically simpler images like PNGs should be nether 100 KB or less for best performance.
Lossy vs Lossless Optimization
It is also of import to empathize that there are ii types of compression you can use, lossy and lossless.
Lossy – this is a filter that eliminates some of the information. This will degrade the image, so you'll have to be conscientious of how much to reduce the prototype. The file size tin can be reduced past a large amount. You can utilise tools such as Adobe Photoshop, Affinity Photo, or other image editors to suit the quality settings of an image. The case we used in a higher place is using lossy pinch.
Lossless – this is a filter that compresses the information. This doesn't reduce the quality but it will require the images to be uncompressed before they tin can be rendered. You tin can perform a lossless compression on your desktop using tools such as Photoshop, FileOptimizer, or ImageOptim.
It's best to experiment with your pinch techniques to see what works best for each image or format. If your tools have the selection make sure yous save the image for web. This is an selection in many epitome editors and will give you the quality adjustments so yous can perform optimal compression. You'll lose some of the quality, and so experiment to find the best residue you tin can without making the images ugly.
Image Optimization Tools and Programs
At that place are a lot of tools and programs out at that place, both premium and gratuitous, that you tin can use to optimize your images. Some requite yous the tools to perform your own optimizations and others practise the piece of work for you. Nosotros are personally big fans of Affinity Photograph, equally it is cheap and gives you nearly identical features to that of Adobe Photoshop.
Here are some additional tools and programs to check out:
- Adobe Photoshop
- Gimp
- Paint.Net
- GIFsicle
- JPEGtran
- JPEG Mini
- OptiPNG
- pngquant
- FileOptimizer
- ImageOptim
- Trimage
- ImageResize.org
Resizing Images to Calibration
In the past it was very important that yous upload images to scale and non permit CSS resize them. However, this is no longer as of import since WordPress four.4 at present supports responsive images (not scaled down by CSS). Basically, WordPress automatically creates several sizes of each image uploaded to the media library. Past including the available sizes of an image into asrcset attribute, browsers can at present cull to download the nearly advisable size and ignore the others. See an instance of what your code actually looks like below.
Subscribe At present

So with more and more HiDPI displays present, it can exist good to find a happy medium. Say 2x or 3x your website'south column or div size, but still less than the original size. The browser volition show the correct i based on the resolution of the device.
The WordPress media library creates thumbnails based on your settings. Yet, the original is withal retained and untouched. If you desire to resize your images and save disk infinite by not saving the original, you can apply a free plugin like Imsanity.

Imsanity allows yous to set a sanity limit so that all uploaded images will be constrained to a reasonable size which is still more than big plenty for the needs of a typical website.
Imsanity hooks into WordPress immediately subsequently the image upload, but before WordPress processing occurs. And so WordPress behaves exactly the aforementioned in all ways, except information technology will be as if the contributor had scaled their image to a reasonable size before uploading.
Clean Your Media Library
If y'all are looking for a tool to save space while also cleaning up your media library, y'all could use Media Cleaner to notice unused media files. The plugin volition scan all your media files and list unused ones in the Media Cleaner Dashboard so you can scan through and delete them.
Media Cleaner implements a smart trashing organisation: when files are deleted, they are moved to a trash directory. That way, y'all are able to test your website for a while and brand sure everything is fine. If a file or media entry is missing, you can easily restore it with a click or simply empty the trash if all looks skilful to you.
Image Optimization Plugins You Can Use
Thankfully, with WordPress, y'all don't have to do all of the formatting or compression by hand. You can use plugins to do at least some of the work for y'all automatically. There are several plugins that will automatically optimize your image files as yous upload them. They'll even optimize images that you lot've already uploaded. This is a handy characteristic – especially if you already have a website filled with images. Here'due south a await at some of the best plugins to format your images for better performance.
It is important though that yous don't solely rely on the plugins themselves. For example, you lot shouldn't be uploading two MB images to your WordPress media library. This can result in eating up your web hosts disk space really fast. The best method is to quickly resize the image in a photo editing tool beforehand, and and so upload it and utilize ane of the post-obit plugins to reduce it further.
- Imagify Epitome Optimizer
- ShortPixel Paradigm Optimizer
- Optimole
- EWWW Image Optimizer Cloud
- Optimus Image Optimizer
- WP Smush
- TinyPNG
- ImageRecycle
Imagify Prototype Optimizer
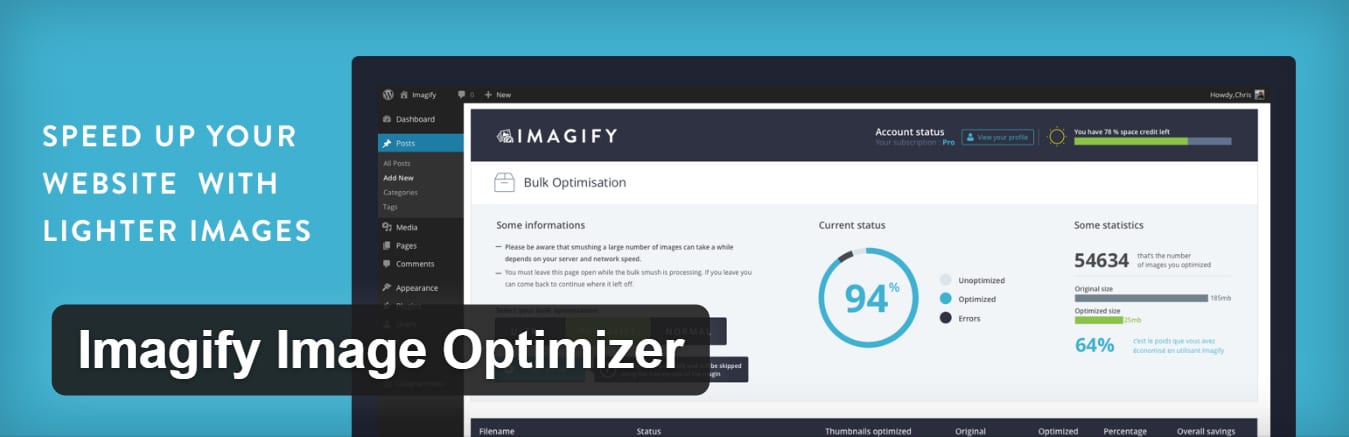
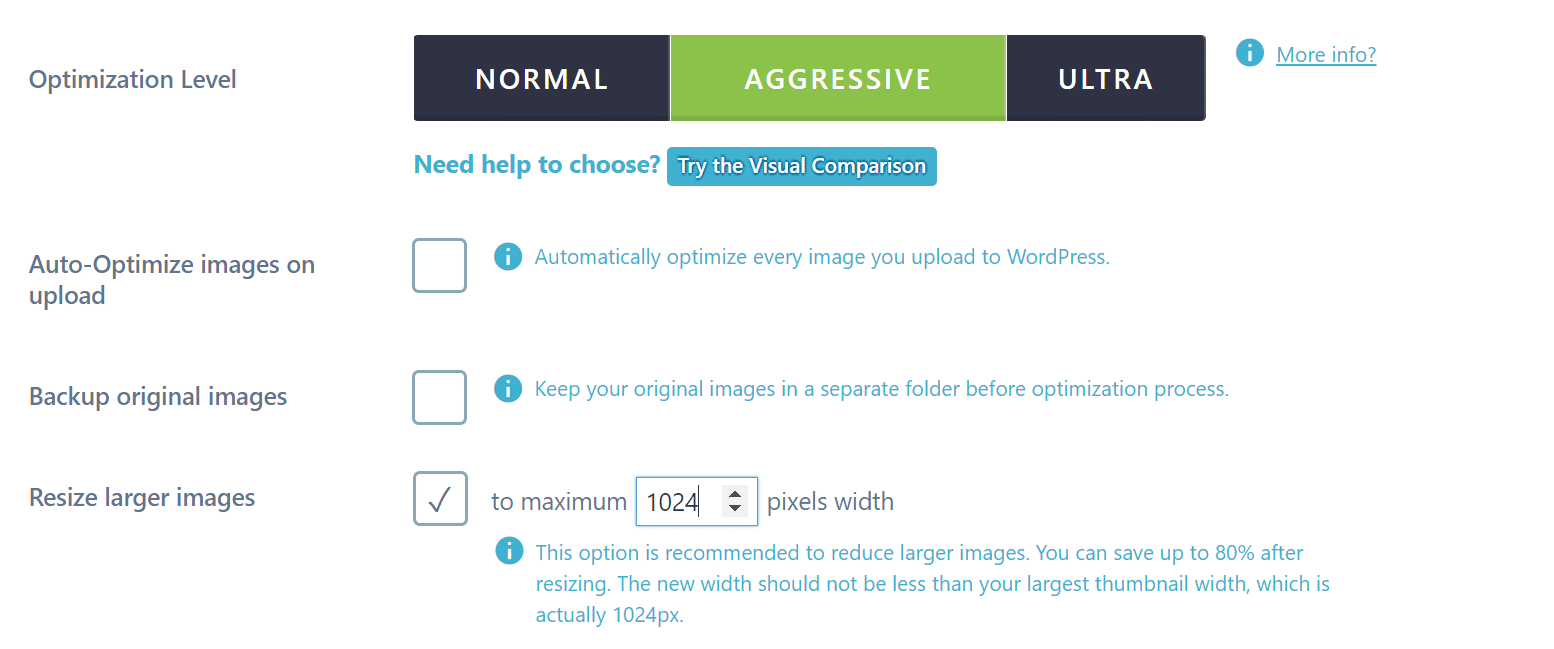
Imagify is created by the aforementioned team who developed WP Rocket, which almost of you are probably familiar with. It is WooCommerce, NextGen Gallery, and WP Retina compatible. Information technology also has a bulk optimization feature and y'all can choose between 3 unlike levels of compression, normal, aggressive, and ultra. Information technology has a restore characteristic as well, so if y'all are unhappy with the quality you tin one-click restore and re-compress at a level which meliorate suits your needs. There is a free and a premium version. Yous are limited to a quota of 25 MB of images per month with a gratis account.
Getting rid of the original paradigm and resizing your larger images can besides be done with this plugin.
Imagify as well compresses images on their third-party servers, non yours, which is very important when it comes to performance. Imagify shouldn't dull downwards your WordPress site.
ShortPixel Image Optimizer
ShortPixel Image Optimizer is a free plugin that volition shrink 100 images per month and will compress multiple types of files including PNG, JPG, GIF, WebP, and even PDF files. It will do both lossy and lossless epitome compression. It will convert CMYK to RGB. Information technology takes your images and thumbnails into the deject for processing and then brings them dorsum to your site to replace the originals. It creates a backup of the original files so you can manually restore them if you want. It will catechumen gallery files in bulk. There is no limit to the file size.
Optimole
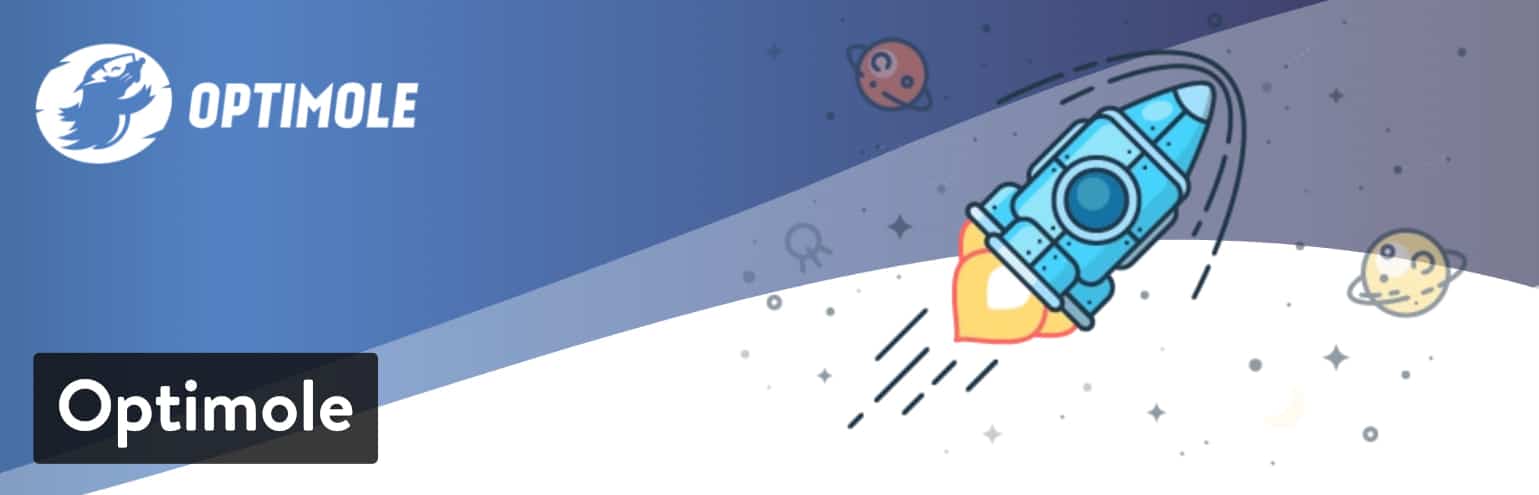
Optimole is an image optimization WordPress plugin that automatically reduces your images' size without whatever work required on your end. It has a big reward when it comes to your site'due south loading speed as it is entirely cloud-based and never serves images that are bigger than they should, aka it displays the perfect image size for the visitor's viewport and browser.
Moreover, the plugin provides lazy loading and efficient image replacement – it downgrades the image quality if the company has a slower internet connectedness – which makes it stand out from the oversupply. It also automatically detects the user'southward browser and serves WebP if it's supported.
All the images that Optimole compresses are served via a fast CDN. You can try Optimole for costless or upgrade to the premium plan if you need extra bandwidth and processing infinite.
EWWW Image Optimizer Cloud

EWWW Epitome Optimizer Cloud helps yous make your images smaller, and your site faster with less hassle starting. With no size limits, and plenty of flexibility, you tin utilize the defaults, or customize the plugin completely to your liking. All EWWW IO users tin can employ the Majority Optimizer to compress their existing images, or utilize the Media Library list mode to option and choose specific images to compress.
Boosted folders tin can exist scanned to brand sure every single image on your site is properly optimized. EWWW IO even allows y'all to catechumen your images into next-generation formats like WebP, or find the best epitome format for an image with multi-format conversion options. Image compression starts out at only $0.003/image.
The premium compression API allows y'all to take compression to a whole new level without sacrificing quality, which unlocks PDF pinch and includes convenient 30-mean solar day image backups. The ExactDN feature which starts at $9/month brings in automatic pinch (with no server-side compression necessary), automatic resizing, and all the benefits of a CDN for faster results, and even more performance across whatever device size.
Optimus Image Optimizer
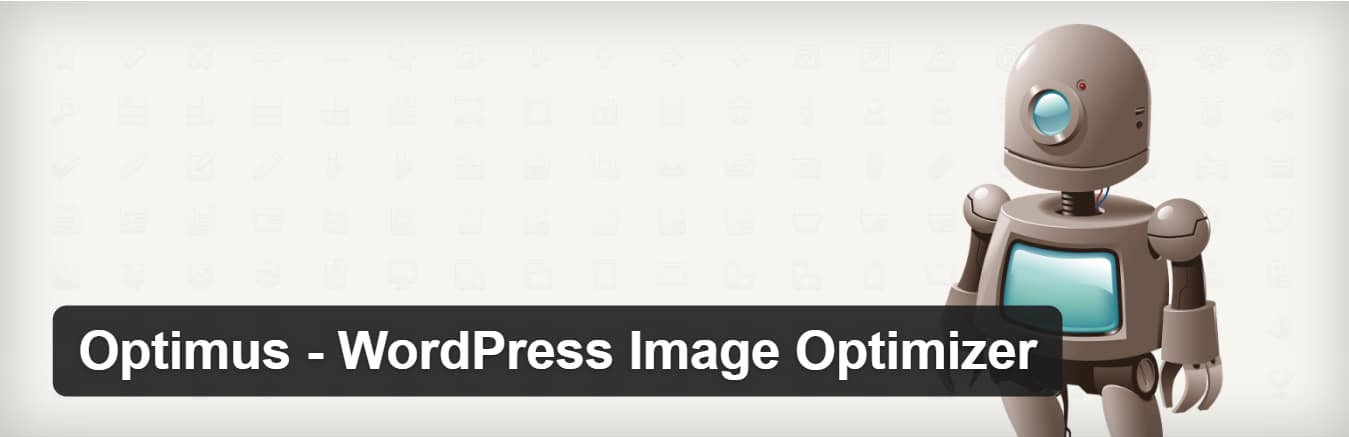
The Optimus WordPress Image Optimizer uses lossless compression to optimize your images. Lossless means you won't see whatever quality loss. Information technology supports WooCoomerce and multi-site and has a nice bulk optimization feature for those with already big existing media libraries. Information technology also is compatible with the WP Retina WordPress plugin. There is a free and premium version. In the premium version you pay once annually and y'all tin can compress an unlimited amount of images. If you combine it with their Cache Enabler plugin y'all can also dive into WebP images, which is a new lightweight epitome format from Google.
WP Smush
WP Smush has both a free and premium version. It will reduce the hidden information from images to reduce the size without reducing quality. It will scan images and reduce them as you upload them to your site. Information technology volition also scan images that y'all've already uploaded and reduce those too. It volition bulk smush upwardly to l files at once. You tin can also manually smush if yous want. It will smush JPEG, GIF, and PNG image types. File sizes are limited to 1MB.
- It's compatible with some of the most popular media library plugins such as WP All Import and WPML.
- All image optimization is done with lossless compression techniques, keeping your image quality high.
- It doesn't affair which directory you save your images in. Smush finds them and compresses them.
- Smush has an pick to automatically set width and acme for all images, and so all of your images get resized to identical proportions.
TinyPNG (also compressed JPGs)
TinyPNG uses the TinyJPG and TinyPNG services (the free account lets you lot compress around 100 images per calendar month) to optimize your JPG and PNG images. It volition automatically compress new images and majority compresses your existing images. It volition convert CMYK to RBG to save infinite. It will compress JPEG images up to 60% and PNG images upward to 80% without a visible loss in image quality. Information technology does not have a file size limit.
ImageRecycle
The ImageRecyle plugin is an automatic image and PDF optimizer. This plugin focuses on not only image pinch but PDFs as well. One really handy characteristic is the ability to set up the minimum file size for compression. For example, if y'all accept images that are 80 KB in size, yous can have it automatically exclude them from compression. This ensures images and files are never compressed as well much. It also includes bulk optimization and auto prototype resizing. Note: They have a free 15-twenty-four hour period trial, but this is a premium service, and images are uploaded and compressed using their servers. They don't charge per calendar month, just rather by the total number of images compressed, starting at $x for x,000.
Optimize Images for Web Case Study
Nosotros decided to do our own piddling case study and tests to prove you lot merely how much optimizing your images for the web tin affect your WordPress site's overall speed.
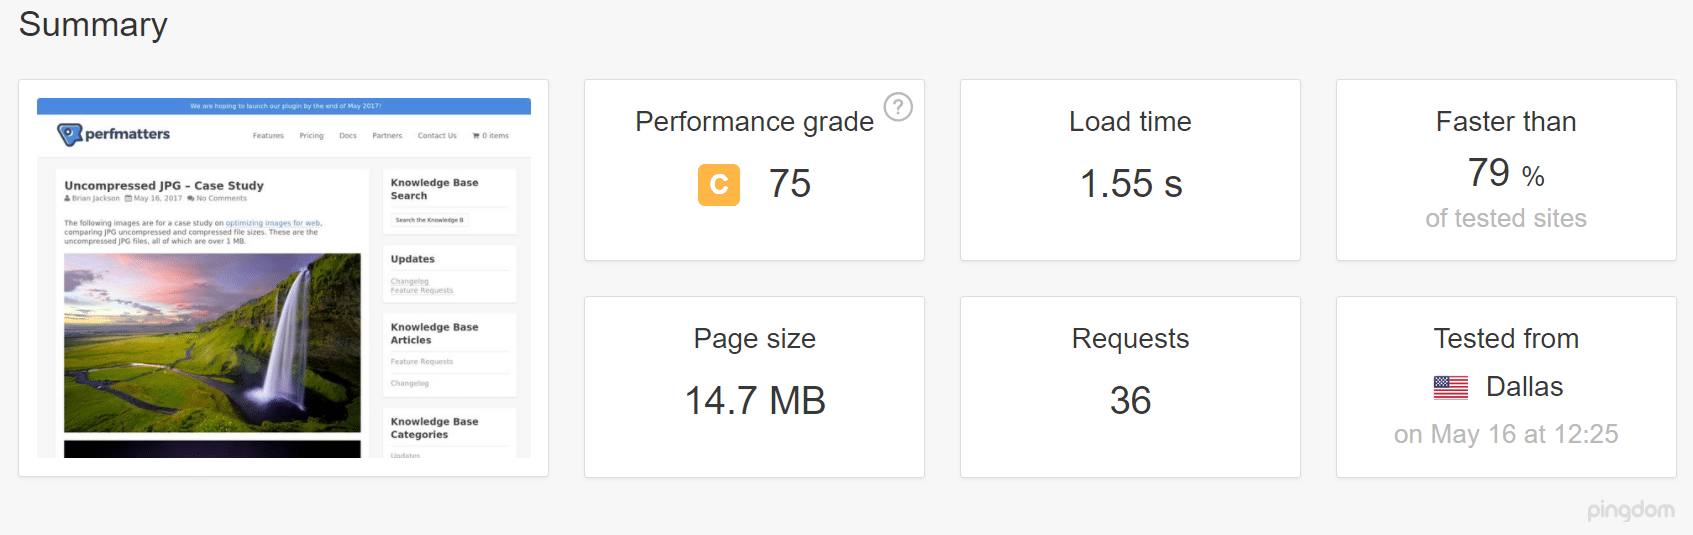
Uncompressed JPGs
We first uploaded 6 uncompressed JPGs, all of which were over ane MB in size, to our test site. (Run into the original uncompressed JPGs). We then ran 5 tests through Pingdom and took the average. As you tin can run into from the speed examination below, our total load time was 1.55 seconds and the total page size was 14.seven MB.
Compressed JPGs
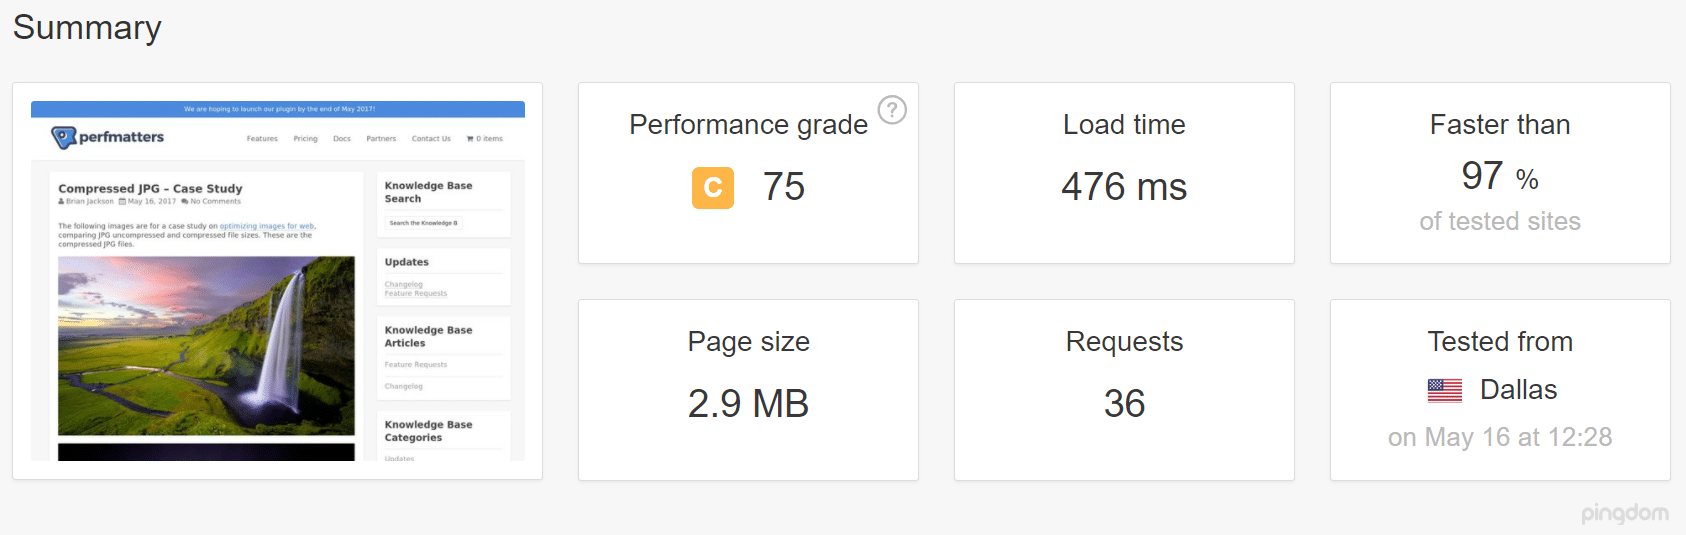
We so compressed the JPGs using the Imagify WordPress plugin, using the "aggressive setting." (See the new compressed JPGs, which however expect just equally beautiful). We then ran 5 tests through Pingdom and took the average. Equally yous can encounter from the speed test below, our full load time was reduced to 476 ms and the total page size was reduced to 2.9 MB. Our full load times were decreased by 54.88% and page size was decreased past eighty.27%.
At that place is almost no other optimization you lot can brand on your site that will go you over 50% decrease in load times. That is why image optimization is so of import, the procedure above was all automated by the plugin. It's a hands-off arroyo to a faster WordPress site. The merely other dramatic optimization y'all could brand would be irresolute up your WordPress hosts. Many customers that move to Kinsta see over 45% speed increases. Imagine moving to Kinsta and optimizing your images!
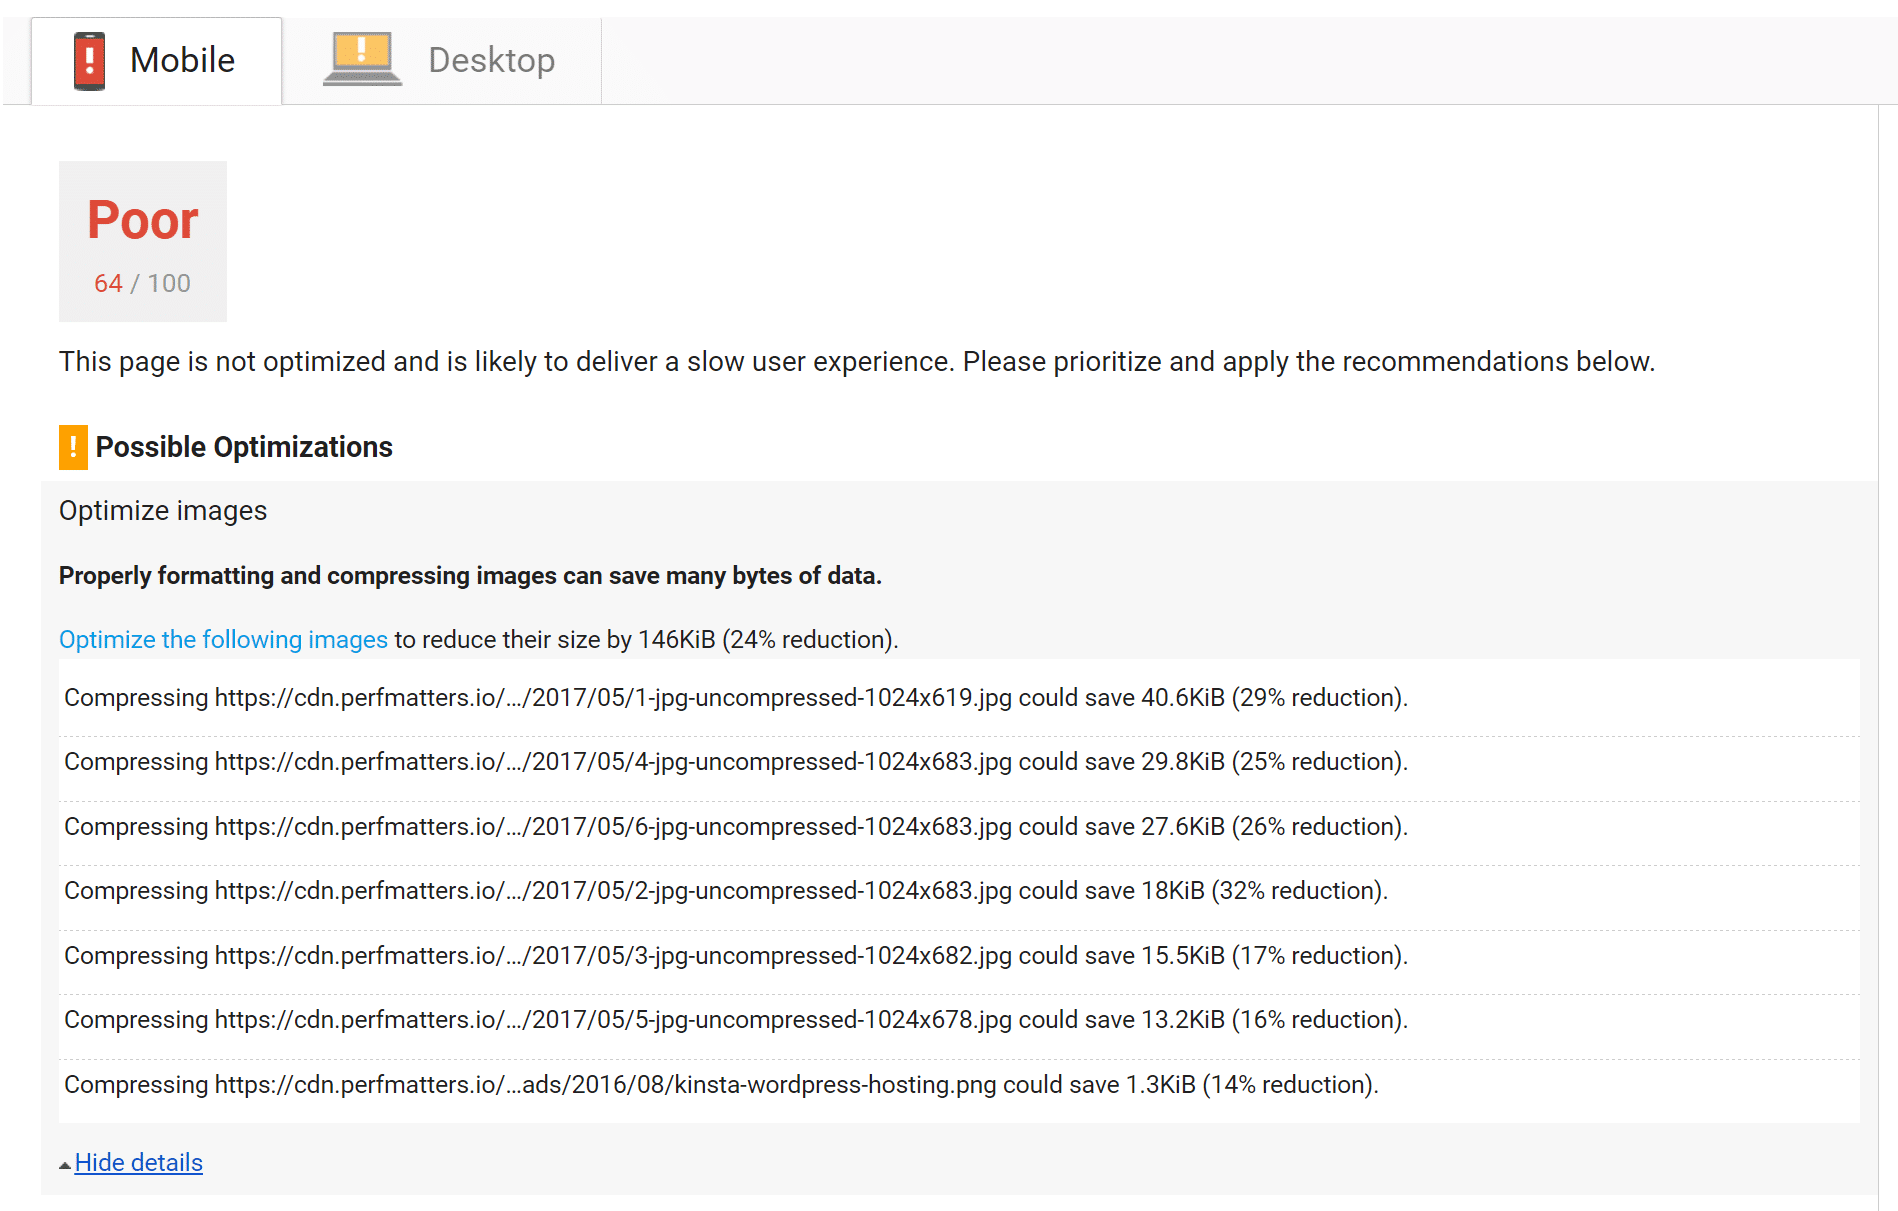
By optimizing your images, whether it is using a photo editing tool or a WordPress plugin, y'all tin also fix the "Optimize images" warning y'all arrive Google PageSpeed Insights (as shown beneath.)
If yous accept other optimization warnings from speed test tools, make sure to cheque out our post on Google PageSpeed Insights and our in-depth Pingdom walkthrough.
We've taken our knowledge of effective website management at scale, and turned it into an ebook and video course. Click here to download the The 2020 Guide to Managing 40+ WordPress Sites!
Using SVGs
Some other recommendation is to utilise SVG files alongside your other images. SVG is a scalable vector format which works nifty for logos, icons, text, and simple images. Here are a couple reasons why:
- SVGs are automatically scalable in both browsers and photo editing tools. This makes for a web and graphic designers dream!
- Google indexes SVGs, the same style it does PNGs and JPGs, so you don't have to worry near SEO.
- SVGs are traditionally (non always) smaller in file size than PNGs or JPGs. This can result in faster load times.
Genki wrote a groovy article where he compares the size of SVG vs PNG vs JPEG. Below are a few takeaways from his testing in which he compared the three dissimilar image types.
JPG (optimized size: 81.4 KB)

PNG (optimized size: 85.1 KB)

SVG (optimized size: half-dozen.1 KB)

As y'all can encounter above, the SVG is a decrease in file size of 92.51% when compared to the JPG. And when compared to the PNG, 92.83%. Check out our tutorial on how to use SVGs on your WordPress site.
All-time Practices
Here are some full general best practices when it comes down to how to optimize images for web:
- If using a WordPress plugin, use one that compresses and optimizes images externally on their servers. This, in turn, reduces the load on your own site.
- Use vector images whenever possible alongside your PNGs and JPGs.
- Use a CDN to serve upwards your images fast to visitors across the world.
- Remove unnecessary image data.
- Crop the white space and recreate information technology by using CSS to provide the padding.
- Use CSS3 furnishings equally much as possible.
- Salvage your images in the proper dimensions. Although recollect WordPress at present supports responsive images to serve them upwards without resizing them with CSS.
- Always utilize .ico file format for your favicon.
- Use web fonts instead of placing text within images – they await better when scaled and take less space.
- Use raster images just for scenes with lots of shapes and details.
- Reduce the bit-depth to a smaller color palette.
- Use lossy pinch where possible.
- Experiment to notice the best settings for each format.
- Apply GIF if you need animation. (only compress your animated GIFs)
- Use PNG if you demand high detail and high resolutions.
- Use JPG for full general photos and screenshots.
- Remove whatever unneeded image metadata.
- Automate the process as much as possible.
- In some cases, you lot might want to lazy load images for faster showtime-folio render.
- Save images as "optimized for spider web" in tools such equally Photoshop.
- Utilise WebP in Chrome to serve up in smaller images.
Once you've formatted your images for better performance and followed best practices, your site will be better liked by search engines, browsers, and networks, and will load faster for your readers. Oh, and brand sure to check out our tutorial on hotlinking, to prevent people from stealing your images and bandwidth.
Have you formatted your images for better performance? Do you format them by mitt, utilise a plugin, or both? Is at that place some other tool or plugin you would recommend? Do you lot take something to add? Let united states of america know about your techniques and best practices in the comments beneath!
Save fourth dimension, costs and maximize site functioning with:
- Instant help from WordPress hosting experts, 24/7.
- Cloudflare Enterprise integration.
- Global audition accomplish with 29 data centers worldwide.
- Optimization with our congenital-in Application Operation Monitoring.
All of that and much more, in ane plan with no long-term contracts, assisted migrations, and a xxx-day-money-dorsum-guarantee. Bank check out our plans or talk to sales to discover the program that's right for you.
Source: https://kinsta.com/blog/optimize-images-for-web/
0 Response to "We Upload Lower Quality Images to the Web Because of a Concern for Which of the Following Scenarios."
Post a Comment